|
|
|
![]()
Intro | Iso Copying |
Iso Compression | Trading
|
Iso - Decompression | Iso Burning | Iso
Emulation
| Thanks! |
A. WHAT ARE ISOs?
ISOs are compact disc images, a file that represents an exact copy of all the
data contained on the original compact disc. Such files are needed when you
want to perfectly copy the data on a CD (on this case, a game CD) to your Hard
Disc Drive. After you copy the image (ISO) file to your HDD, you are able to
send those files to other people (trade ISOs), so they can use a CD-Writer to
burn the images back on a disc and play them on a modded PlayStation or
Sega Saturn machine or play them using softwares called emulators.
B. WHY DO I NEED TO COPY AN ISO? CAN'T I JUST COPY AND PASTE THE DISC FILES
TO MY HDD?
No, that's not the case when you plan to burn the data back on a CD. A Compact
Disc has a special file structure on it, and when you just copy&paste the
files on your HDD, like you'd usually do in most cases, such structure is lost.
Later when you try to burn the files from your HDD to a disc, the game CD probably
won't work on any platform. And you can't blame your writer, console or God.
That's why you need specific software (read next item) for copying ISOs. The
image (ISO) of the disc, along with the files, stores all structure data needed
to make a disc later on.
C. OK SO... WHAT DO I NEED TO START THIS WHOLE GAME TRADING VIA INTERNET?
Here is a list of everything you should know and have if you plan to start trading
ISOs:
(1) If you're trading console games (i.e. PlayStation, Sega Saturn, Sega CD,
Neo Geo CD), you should, first of all, have a modchip if you're using a Playstation
or Sega Saturn. Sega CD and NeoGeo CD don't need modchips. Modchip is a little
chip that allows your console to play burned games, by cheating over the original
protection against such discs. If you wish to learn more about modchip, go to
a search engine like www.google.com and type "modchip"+"[your
console name here]".
(2) If you don't plan to play the games you got on a console, but on an emulator,
then you won't need a modchip, but a good emulator. In case you're wondering
what this emu-thing is, it's a software that simulates the console hardware
on your PC, thus allowing you to play your console games on the PC. For further
information on emus, read the emulation section.
(3) Software: here is listed all the software you should have for trading ISOs:
HANDY STUFF:
- Make a list of ALL the disc games you have. Don't matter how many you have,
but people will want to know your games frequently, so just do a favor to yourself
and type this list on Notepad <Start, Programs, Acessories, Notepad> and
keep it saved somewhere on your HDD, so you can show it to people later. And
remember to keep it updated and add any new game you might have gotten in your
collection.
- A mod-chip for playing burned games on a PSX and Saturn.
- A CD-Writer for burning the ISOs to a disc and saving space on your Hard Disc
Drive (or playing them on a console).
ISO-copying:
- ISObsuter
http://www.isobuster.com
- Golden Hawk CDRWin http://www.goldenhawk.com
- Disc Juggler
http://www.padus.com/downloads/demo.php
ISO-Compression:
- WInRAR http://www.rarlab.com
- WinACE http://www.winace.com
ISO-Trading:
- WS-FTP
http://www.ipswitch.com/downloads/index.html
- ICQ
http://www.icq.com
- IRC script (like Polaris or mIRC) http://www.mirc.com
- AIM (AOL Instant Messenger) http://www.aol.com
ISO-Burning:
- Golden Hawk CDRWin http://www.goldenhawk.com
- Ahead Nero
http://www.ahead.de/en/download.htm
ISO-emulation:
- ePSXe (PlayStation) http://www.epsxe.com
- VGS (Playstation)
VGS
(discontinued and doesn't work in Windows XP)
- Satourne (Sega Saturn) http://www.satourne.consollection.com/index.php
- Gens (Sega CD)
http://gens.consolemul.com/downloads.shtml
There are two softwares recommended for copying ISOs from game
CDs. They are ISOBuster and Golden Hawk's CDRWin, and they're both all you'll
need for copying Console games. As for PC games, there are cases of games that
can't be copied, due to the protection written on PC discs. In this case, you
may want to try Disc Juggler, a program that can avoid the protection problem
by simply not trying to copy them to the ISO.
Note one important thing: ISO files can be huge (up to 700 MegaBytes), so be
sure you have enough space on your HDD. Now on to ISOBuster:
A. ISOBUSTER:
ISOBuster is the easiest tool to use if you want to copy an ISO, although CDRWin
seems to be liked better for most people. First, you put the game disc you wish
to copy in your CD-ROM driver, and open the program. It should automatically
load the disc content (if not, click the "Refresh" button on the tool
bar, and be sure the right CD-ROM driver is selected on the upper bar). Now
you should see the disc structure like this:
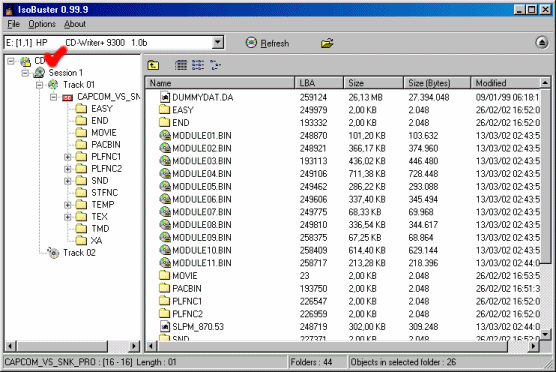
You see the very first Disc logo red-marked on the root of the right window? For starting
the copy process, you must right-click that icon and select the following
options (they may be in bold):
Extract CD <Image>
RAW (*.bin,*iso)
After you select such options, a window will popup, asking where the ISO file
should be saved to. After you've choosen the right folder, you need to type the
name of the file. The common thing to type is the name of the game, followed by
the correct format extension you choose (either *.iso or *.bin, it really
doesn't matter). Example: Final_Fantasy.iso
Immediately after that the copying process should start. Depending on the amount
of RAM memory on your machine, Windows could slow down during the process, due
to intense use of HDD by the ISOBuster software. So it would be better for you
to relax and wait for the whole copy to finish. It should normally take around
10 minutes for a 700 MB game.
B. CDRWIN:
CDRWin is largely more used than ISOBuster for copying ISOs, although here there
are some settings you should be sure to select before start copying.
This is the CDRWin start menu:

For copying ISOs, you should choose the red-marked option. After you select the
Extract Discs/Tracks/Sectors option, you'll be brought to the following window:
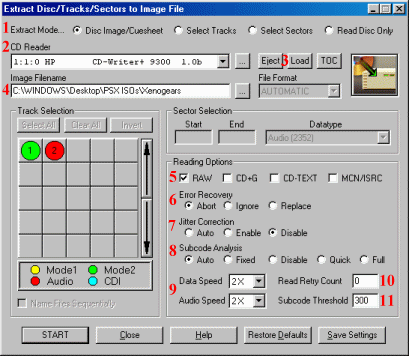
Here there are lots of options you should be aware:
1) Extract Mode...
Set as Disc Image/Cuesheet
2) CD Reader:
Select the CD-ROM device you plan to insert the disc (example: E:, D:).
3) Eject/Load buttons:
Use those to eject/load the current disc. After you've putted the game CD on the
selected driver, you may click on the "Load" button, so CDRWin will read the
game structure, shown on the left colorful window.
4) Image File Name:
On the right side of this bar there's a small "..." button. Click on it and
choose the path where the file will be saved to. Be sure to type the file name
as well. No need to type .bin or .iso after the name. CDRWin automatically
puts the .bin behind it. So just type the name of the game. In the end it will
make a bin and a cue file. the cue file contains info on how the bin
should be burned. Some programs use cue files but you can burn it yourself too
without using it. See Part 6 about ISO Burning for more help.
Now to "Reading Options" (bottom-right of window):
5) Reading Options:
Check "RAW" only;
6) Error Recovery:
Set as "Abort". So if CDRWin finds any error on reading the disc, it will
immediately abort the copy process.
7) Jitter Correction:
This is something you'll need for audio discs only. In any case, set as
"Disable".
8) Subcode Analysis:
Set as "Auto".
9) Speed:
Set both data and audio speed at the same reading speed of your choice. Here
there's an important note: Some games may present problems during copy operation
if copied at fast speeds. If you experience error messages of any kind copying
some disc, try to lower the reading speed to something like 2x.
10) Read Retry Count:
This sets how many times will CDRWin retry to read a sector it couldn't on the
disc. If CDRWin have troubles reading a sector, it probably will not succeed in
the second try either, so you may set this as "0".
11) Subcode Threshold:
Set as "300".
Now you're done. After all the settings have been chosen, you click on the "Save
Settings" button on the bottom tool bar, so that all the settings will remain
the same after you close the program. This way, the only thing you'll need to do
next time is Step 4, Image File Name.
After settings were saved, click on the "START" button and sit back, enjoying
the marvelous ISO copying process!
Note: Depending on the amount of RAM memory on your machine, Windows could slow
down during the process, due to intense use of HDD by the CDRWin software. So it
would be better for you to relax and wait for the whole copy to finish. It
should normally take around 10 minutes for a 700 MB game.
C) DISC JUGGLER:
-- This Section is Coming Soon --
D) TROUBLE SHOOTING:
The process of copying a ISO from the CD seems quick and joyful, but sometimes
problems may occur that could drive you nuts. The most frequent problem you'll
have is either ISOBuster or CDRWin telling you they couldn't read a specific
Sector of the disc. Read further for more instructions on what prayers you
should know for this case:
D.1) The copying seems fine, but when the software I'm using gets to a specific
percentage of reading, it keep reading that section forever!
In case you're using CDRWin, you may want to try and copy the disc at a lower
speed, or close other software running to free RAM memory. See if doing this
solves the problem
However the most common reason is a problem with the disc you're trying to copy.
It may be scratched, or have some kind of damage done to it that can't be
actually seen. In this case, even your Console's readers would not be able to
read the disc on that specific sector. Chances are, when the game needs to load
a data from that sector, it will freeze on your console as well. I feel sorry
but there's nothing you can do in this case, except for trying to acquire
another copy of the game.
There's also another possibility for this mess (hehe you're relieved your game
may not be damaged at all heh). Some Console games (usually the best-sellers)
have protection on them, exactly as most recent PC games do. In this case, the
easiest way to retry reading the disc is applying a patch you can find on the
net, a patch that can avoid protections for that game. For patches, try
searching on www.gamecopyworld.com
D.2) I receive a message error saying "Disc Sector <sector number> couldn't be
read".
See item D.1 above.
D.3) I have a PC game that I'm sure can't be damaged, yet I receive error
messages when trying to read it with CDRWin or ISOBuster.
If you're trying to copy a PC game disc with ISOBuster or CDRWin, but can't
succed, probably the reason is disc protection. Differently from Console games,
that are usually not protected against copy, lots of PC games can give you
problems of this kind. In case it's really a protection problem, you should try
and use the Disc Juggler software. Disc Juggler has the capabilty of ignoring
the protections by not trying to copy them to the ISO. in this case, the game
may be properly copied.
If Disc Juggler still doesn't work for you, then there are other two
possibilities: Disc Juggler couldn't avoid protections for that specific game
(uncommon), or your game is really damaged, sorry. Maybe you should learn to
take more care of your discs ;)
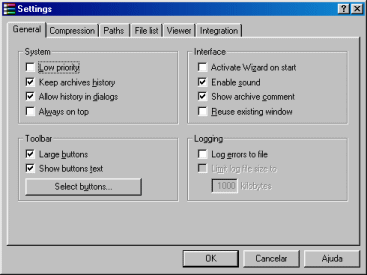
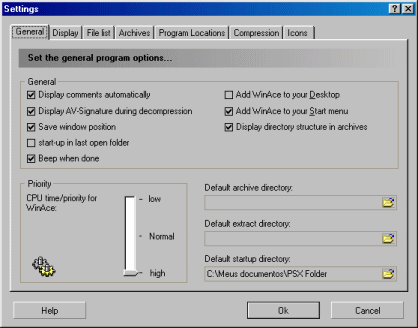
Under the "General" sheet, be sure the option "Low priority" is UNchecked.
Now under the "Compression" sheet, you may set a Deafult Folder for putting
compressed files, and a Default Folder for Files extracted. After that click on
the "Create Default..." button. You'll be brought to this screen:
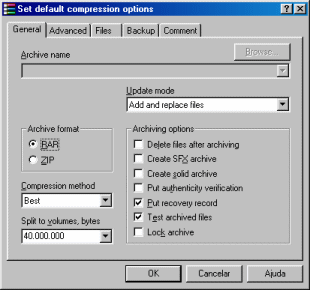
SHEET General:
Archive Format: set as RAR;
Compression Method: set as Best;
Split to Volumes, bytes: set as 40,000,000
Archiving Options: Check ONLY "Put Recovery Record" and "Test Archived Files".
SHEET Advanced:
Recovery Records: set as 10%
Click "Compression" button. On the new window, go to Dictionary Size and set as
4096 (if this option is not available you should download a updated version of
WinRAR at www.rarsoft.com).
Ok you're done with WinRAR settings. They are automatically saved so you don't
need to set these options again next time. Now when you want to compress files,
you just select the files and click on the "Add" icon on the toolbar. Then you
immediately click "OK" on the options screen that shall popup, and the
compression will start.
C) WINACE:
WinACE is quite similar to WinRAR. Actually the main difference is graphic
interface only. So if you have set the options for WinRAR before you shall be
familiar with WinACE options.
Firstly, open WinACE. Press Alt+F9 and the options window shall popup. It should
look like this:
SHEET General:
Priority: set as "high".
Note you may set default directories for archiving, extracting and starting as
well.
SHEET Compression:
Archiving Type: set as "ACE"
Compression Level: set as "Maximum"
Folders: set as "keep directory structure"
Dictionary: set as 4096k
Create Solid Archives: uncheck.
Protect Archive from Damages: check.
Check CRC after compressing files: check.
Create SFx-File: uncheck
OK, now you're done with settings. They are automatically saved so you don't
need to make everything again next time. When you want to compress a file, you
select them on the directories window on WinACE and click on the "Add" icon in
the tool bar. The following window should popup:
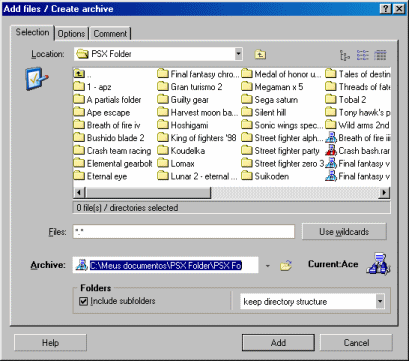
SHEET Selection:
Archive: select the path where to compressed file will be saved to.
SHEET Options:
Volumes: type in the bar he following volume 40,000 This way the files will be
splited to easy-to-handle 40MB volumes.
After this, click on the "Add" button on the bottom-right and the compression
should start. Sit back and relax!
D) TROUBLESHOOTING:
If you get error messages when compressing files, there are a couple actions you
should take:
1) Make sure all settings are right.
2) If you tend to keep using your comp and have other software running while
WinACE or WinRAR compress, stop that. Let the compressions make full use of
your hardware, so they can be always succesfull and faster.
3) If (2) is not the case, then I'm afraid you need to DEFRAGMENT your Hard Disc
Drive. When a HDD is too fragmented, compression utilities tend to have problems
processing big files such as ISOs. I know defragmentation is something that
could take a long while to perform (half a day depending on your HDD size and
level of defragmentation), but it's an action you must perform in order to
succesfully compress files, and even de-compress then.
One VERY important note: when your defragging, you MUST have ALL software
closed. Close all the software you can see, and for those that run on Windows
background, you press Ctrl+Alt+Del.
On this Ctrl+Alt+Del screen you can shut down background programs (for Windows
NT/XP click on the program managing button on this screen) . Leave ONLY Explorer
running. Notice even Anti-virus and Firewalls should be closed to perform a
quick and efficient defragmentation. If you're afraid of virus, hackers and
those sort of things, I recommend you unplug your modem and lose connection with
internet while the defrag takes place.
Now that everything was shut down, here's how you defragment HDD (Windows 98
instructions). Go to:
Start => Programs => Accessories => System Tools => Disc Defrag
Select the HDD driver (usually C:), go to Configuration, check both boxes there,
then click on "OK" button. Defragmentation should now take place, and may take a
long, and I mean LONG time to finish. I usually perform this while I'm asleep,
so when you wake up it will probably be done or almost done. IMPORTANT: while
your comp is defragging, you DO NOT use it.... just let it work and go live a
little on the offline world!
4) If Defragmentation didn't solve the problem, then i'm afraid my friend, you
could have hardware problems, most likely RAM memory inefficiency :( . If so,
you should search for experienced support, or make use of your warranty, if it
stills up. Good luck ;)
Fine, now that you have the game ISO copied and compressed, it's
time to start trading. If you're wondering how you're going to send such a big
file to other person, the answer can be: chat programs. They're pretty efficient
for that matter and, if you don't have a FTP available, the easiest way to set
transfers, as you can chat with the trader while you do the job. Here we will
quickly cover the most used software for trades and also FTP overview.
A) ICQ:
ICQ is hated by some people, loved by others, but in any case, you may need or
want to use it for transfers as it's way popular and many people may only use
this single chat program.
For sending files on ICQ, first of all you need to add the trader's ICQ number (UIN)
to your Contact List. Do so by finding or asking his number and, on ICQ Advanced
mode, click on the "Add" button at the bottom of the window to Add him to your
list. It may be required that the other guy authorize you before you can add him
to your list, and on this case you shall wait for his authorization.
After his name is on your list of contacts, for starting sending the file you
left-click his name and select:
Send/Get File => Send File

Then you should be asked to select the files (you may select multiple files)
and add a commentary so that the other user can read what the transfer is about
(this is obviously not required since the guy knows you'll send him the file).
After that, you click "OK" button and the transfer should immediately
start. Now enjoy the game sending!
B) AIM:
You need to have the name of the other trader in your Buddy List in order to
send him files. In order to do that, simply click on the "Configuration"
sheet and the "Add Buddy" icon on the bottom tool bar ![]() .
Then you'll be asked to type the guy's screen name. Type his nickname there
(exactly as it is shown to you, with necessary upper and lower case, spaces
and whatever. Make sure not to mistake zero's and letter O's with each other).
.
Then you'll be asked to type the guy's screen name. Type his nickname there
(exactly as it is shown to you, with necessary upper and lower case, spaces
and whatever. Make sure not to mistake zero's and letter O's with each other).
After his name is online on your list of online buddies, you right-click on
his name and select "Send File" option.
Notice you may choose to either send a single file or a whole folder (good for
sending split files). After you've selected the compressed files to send, just
click "OK" and the send shall start.
C) IRC:
IRC is a chat community, for accessing it you need a script such as mIRC or
Polaris. I'll cover mIRC here, since Polaris is almost the same, you may set
it yourself based on mIRC description.
First of all, you and the other trader should connect to the same server. The
most common ones are DALNET or NEWNET. As soon as you open mIRC, the Options
window should popup. Now I'll show every single option window and the settings
you should change; if I don't mention one setting, it's because it should be
left as it is:
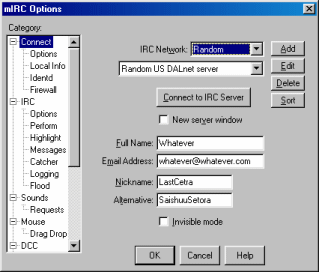
IRC Network: Choose the Network you wish to connect to. It's the same as the
other guy is connected to. Example: DALnet or Random
On the bar below, pick one of the servers on that network. It really doesn't
mind which server you pick, just choose "random" if such option exists.
Full Name: type a name here
Email Adress: type any email address
Nickname: Type one
Alternative: an alternative nickname, so it's picked when the other one already
exists on the network (people could connect with the same nick you've choosen,
it's not registered)
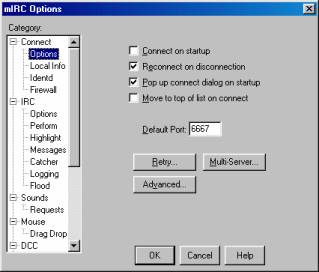
Reconnect on Disconnection: check
Pop up Connect Dialog on Start Up: check
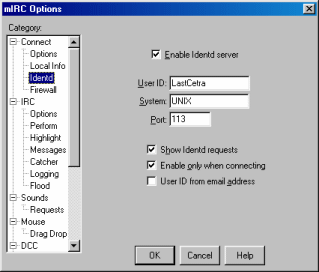
Enable Identd server: check
UserID: your primary nickname
System: UNIX
Port: usually set as 113
Enable only when connecting: check
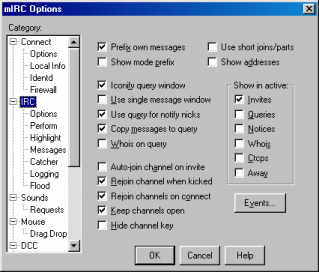
Rejoin Channels on Connect: check
Hide Ping Pong Event: check, since this is annoying
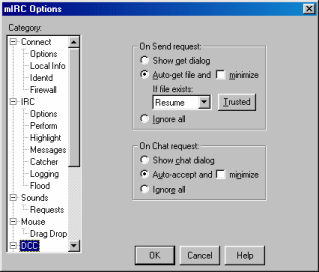
On Send Request:
If you want the file sent to be automatically saved to your HDD, choose
"Auto-get file and" "If file exists: Resume". By choosing those options, if the
connection between you and the other user fails for some reason during the
transfer, and you're not there to resume it, the other side just needs to send
the file again and it will be auto-accepted/resumed. This will save you time.
If you have Auto-get selected, you should then go here and:
DCC Folders: let as "default", and click the Edit button bellow. A new window
will popup, and there you choose the default folder where all files received
shall be saved to.
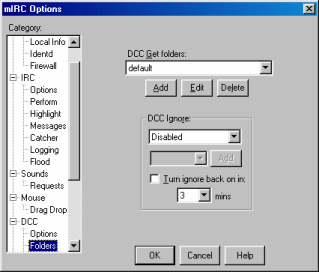
DCC Ignore: this option ignores certain types of files. You MUST set it as
"Ignore", and DON'T check "Turn ignore back on in:"
After everything is done, you should go back to the Connect option and click the
big central "Connect" button. This main connect window will popup every time you
open ICQ, and since all settings will be saved, you won't need to check
everything again, just connect right away (after settling with the other guy the
server you'll connect to). When you're connected to the chosen network, you
both need to enter the same channel. here's how you do this: go to the bottom
bar on the main window and type:
/join #name_of_the_channel
where "name_of_the_channel" is the name of the channel you guys agreed to go in
(you may choose any name, if the channel doesn't exist it will be created a
temporary room for you two to connect).
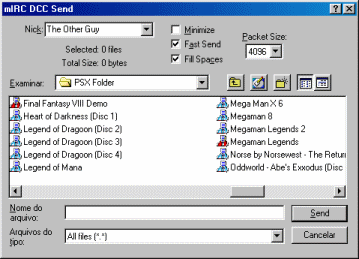
When you're in the same channel, you should be able to see the other guy's
nickname on the users name list on the right side. Then you click the user's
name, choose DCC, Send, and pick the file you which to send to him (see
pick). Remember to type the nickname of the person you're sending it to
correctly. )in the example pic it's "The Other Guy". That name will be saved and
next time if you still want to trade games with him in the future you can just
click on the arrow and his name will appear in a list. After this the transfer should start. After the connection between you two
has been established, you can quit both the channel and the server, it doesn't
make a difference. But notice you need to remain in the same network/channel if
there's a need to resume the file.
D) WS-FTP:
If the other guy has a FTP, it would be better for you two to use it for uploads
and downloads. You can better acces FTP's through FTP programs like WS-FTP or
CUTE-FTP. Here's how you access an ftp using WS-FTP:
When you open WS-FTP, a connection window should popup. If you want to upload to
or download from the FTP's owner, you need to get his address (IP), and
username/password if that's needed. The guy who knows the FTP should know the
info needed for your logging. Don't ask the info to me, since it varies from FTP
to FTP (it's settled by the owner).
For registering a new FTP place on the "Host Info" sheet, so you can easily
access it later by double-clicking on its name, select the folder where you want
the ftp to be saved to and click on "File => New Site" on the Connect Window
toolbar.
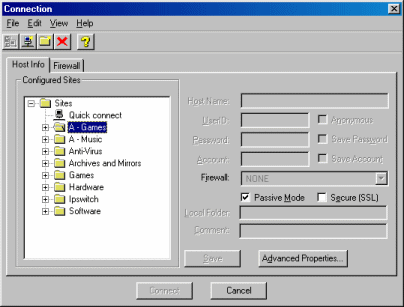
Now a wizard will start asking you weird questions that the other trader should
answer.
In the first window:
Site Profile Name: you simply type in the name you want the ftp to be given
after saved on the selected folder.
Host Name or IP Address: you should type the ftp address the other guy will give
to you. Watch out for spaces that could accidentally appear if you copy and
paste the address given. If you put spaces where they should not be, it won't
connect.
In the second window:
User ID: here you type the username the guy told you about. If there's no
username needed, just check the "Anonymous" box.
Password: if you were assigned a username, you'll need a password to go in. Type
the password here.
In the third window:
Host type: set as Automatic Detect.
Port: the guy should tell you (usually 21).
Now you just click Finish and you'll be back to the connect window. The
difference now is that the ftp you just added should be shown on the previously
selected folder. You double-click on the ftp and it will attempt to connect. If
you succeed, the ftp's root directory will appear in the right window.
Now you just search through it and select the files you want to download, then
copy and paste on your HDD driver (left directory window). For uploading, simply
copy from your driver and paste on the ftp. Simple!
After you've downloaded the compressed ISO from the guy, you
must de-compress it. If the file is split in various files, it could be either
in a ".r00, .r01, .r02" format or ".part01,rar, part02.rar, part03.rar"
in WinRAR. You should select the main file (*.rar for first case, *.part01.rar
for second case) and right-click it.
If you have WinRAR installed (you should duh), choose the option "Extract
Here" or "Extract to [file name] folder". The first option will
extract the ISO file to the same directory as the compressed files; the second
will create a directory under that same folder with the name of the file.
After you choose to extract the first part, the other parts will be automatically
loaded and extracted by the program.
IMPORTANT NOTE: You CAN'T extract split RAR file with WinACE, nor split ACE
file with WinRAR!
TROUBLESHOOTING:
A) CRC Errors:
While you extract the compressed ISO, you may unfortunately get an error message
with a CRC error or something like that. A window like this should appear, on
WinRAR:

If the file is split (hope it is), then you will need to download the part
where the extraction was corrupted again. You can tell the part since it's name
should be shown in the CRC window. That's the advantage of working with split
files, you just need to download that single corrupt file again instead of the
whole game if it was compressed in one single huge file.
However, before downloading the file, you may want trying to RECOVER it. If the
other guy added a RECOVERY RECORD (I tell you to do so in my guide here), the
file can be recovered to its original working state. In order to do that, on
WinRAR you select the file(s) and click on the "Repair" icon on the tool bar.
![]() On WinACE, you select the files and go to "Archive =>
Repair Archive".
On WinACE, you select the files and go to "Archive =>
Repair Archive".
If none of those options (re-download or repairing) worked, then I'm sorry to
say you can't recover it. If you're wondering why this damn CRC error occured,
the answer is simple: probably it's due to HDD high level of fragmentation. Read
Section 3.D.3 for learning about how to DEFRAG your HDD.
OK now that you've got the ISO file de-compressed, you'll want to burn it, so
you can save that lot of space on your HDD or play it on a console. I'll guide
you through burning with two softwares, CDRWIN and Nero. Here you go:
CDRWIN:
After you open CDRWIN, the main screen will appear. Enter the first icon, the
one with the laser on the CD. Then the following window will popup.
1) Select the CD-Writer you plan to use for recording the game
2) Load Cuesheet. If the ISO came with a cuesheet (it will if it's a cdrwin
*.bin file), you can just click here, search for the <Game_Name>.cue file on
your HDD and load it. All the burning info will be correctly picked. Be sure to
have the *.cue and *.bin file on the SAME folder.
IMPORTNAT NOTE: If you downloaded the cuesheet from the other guy, then it will
be saved with the path it was stored in his computer. In this case before
loading the cuesheet you open it with Notepad, and you shall see the original
path of the file. Replace that with the path the file on YOUR HDD. Example of a
cuesheet:
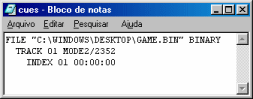
See the path between the inverted commas? Write YOUR path there.
After the cuesheet is loaded, you may skip to step 4 below.
3) Load Tracks. If the image file did not come with a cuesheet (*.cue file),
then you'll need to load the image and CDRWIN will build a cuesheet itself. Just
click here to go to the window below and click "Add..." button for selecting the
image file to be burnt, then "OK" button to confirm.
4) Now that the file/cuesheet is loaded, it's time for setting a couple options
on Devices button. When the Devices window popup, go to the Caching sheet shown
below and select the following options:
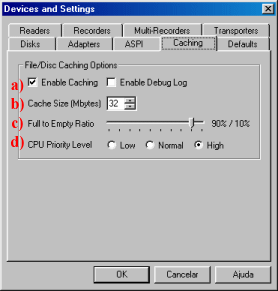
a) Enable Caching: check
b) Cache Size: set to the maximum possible value, but be sure it doesn't exceeds
50% of your total RAM memory (if you have no idea what I'm talking about set it
as 16 MB and it should be fine). The higher the Cache Size, the slower will be
your computer during the operation, but more reliable will be the burning
process.
c) Full to Empty Ratio: 90% / 10% is cool.
d) CPU priority level: for your game's sake set as high.
Now click OK button and let's go back to the burning window. Click the "Save
Settings" button on the bottom-right so next time you come here you just need to
load the cuesheet and skip step 4. OK final step, step 5.
5) Set the burning speed as 2x. I know you may complain it's slow, could take
40min for big games to burn, but it's the safest speed for _console_ games. If
you burn any faster than 2x, don't complain about game problems later, if there
are any. Anyway, why take the risc?
Before you click the "Start Recording" button, be sure to close every other
program you're running, to give CDRWIN full-priority over your hardware. This
way you can guarantee a successful burn for sure.
6) The burning should start. After it's over, the disc will be ready for playing
anywhere on a emulator or a modded console.
AHEAD NERO:
NERO may be the best option for burning your games, it's simple reliable and
fast. When you open Nero the Wizard window should popup. Close it, only whimps
like you wish to use wizards (hehe).
Go to "File => Burn Image..." and it will be much quicker. After this a search
window will come, for you to search the image file you wish to burn. Be sure to
select on the bottom box "All Files (*.*)", so you can search for BIN files as
well.
If the file you wish to burn is a Nero file, you select it and shall go straight
to the burning start window. However, most of the times it will be a BIN file,
and the scary window below will haunt you:
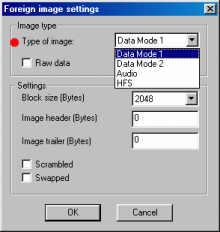
Type of image: if you're burning a PC game, select Data Mode 1 and Block Size
2352, if you're burning a console game, select Data Mode 2. Block size gets
automatically chosen when you pick Data mode 2. Everything else should
remain as it is o don't touch anything else. Then you click OK and the last
screen will come, asking for burning speed.
If you wish to test the file before bunring, check the test and burn option
(will take double time), or else choose just "burn".
Set the burning speed as 2x. I know you may complain it's slow, could take 40min
for big games to burn, but it's the safest speed for _console_ games. If you
burn any faster than 2x, don't complain about game problems later, if there are
any. Anyway, why take the risk? And let "Create Image" UNCHECKED. Click OK and
sit back.
Before you click the "Start" button, be sure to close every other program you're
running, to give CDRWIN full-priority over your hardware. This way you can
guarantee a successful burning for sure.
We'll cover PSX and Sega CD emulation in this section. Other CD consoles like Saturn and NeoGeo CD we have no knowledge of them or they're not compete yet. There are two well-known PSX emulators. Connectix Virtual Game Station (VGS) and ePSXe. VGS is simple to use and install but unfortunately it has been discontinued and thus it's no longer updated and the official website is gone. It doesn't work in Windows XP either. XP users will then have to resort to ePSXe which works fine in Windows XP (or partition their hard drives in two for 2 Operating Systems, one for XP the other for win98 but that's anoher story, don't ask).
PSX Emulation
The better emulator ePSXe is hard to setup but it's advantages are that
it's more compatible and it enhances the graphics even better than the actual
PSX console itself on your PC! This depends on your 3D videocard how good it
does that.
VGS on the other hand works very easy. Just download it and install it. All you
need to setup are the control buttons. It has an auto-detect system that
automatically detects and runs any PSX game that is inserted in your CD drive.
Not all games might work though since VGS has a lower compatibility than ePSXe.
(note that some games might not work on ePSXe but will on VGS, so it wouldn't
hurt to have both these emulators in your PC if you have win98 )
To see if your game is compatible with either of these emulators, click
here for ePSXe and
here for VGS. (remember to check which region your game is, NTSC or PAL).
VGS can be downloaded here. There's no complicated explanation needed for it. Install it and
you're done. Play the CD directly from your CD drive.
For ePSXe you'll need several things.
- the emulator itself is here
- the BIOS files. The SCPH1001 (NTSC) and SCPH7502 (PAL) BIOS files
are Copyright Sony. So it's very very illegal that you have them. But
since you're in emulation you kinda knew that emulation itself is pretty
much illegal already; though the BIOS are more serious than the burnt games.
You can't download the BIOS from any official site. Use
Google search engine to find
them. If you're really bad at searching or just lazy (hehehe)
you're only chance to get them is by asking somebody you know is into
emulation for them on chat programs. Don't ask for them on message boards
because that's not allowed anywhere. The BIOS files go in the BIOS folder
of the ePSXe emulator after you've extracted it.
- Plugin files. These files make sure the Graphic, sound and CD driver work
properly to emulate the game. This is where the hard work starts.
Graphics plugins: Each plugin works best with different computers.
So if you have a Voodoo3 or Geoforce/TNT video card you'll have to use a
specific pugin which works best for you. Voodoo users are supposed to use Pete's
OpenGL plugin and Geoforce/TNT use Pete's D3D/D6D plugins. But this might
be different on some computers. So if the game doesn't run right you might want
to switch between these two plugins or try a complete other one. It's all about
experimenting on each until you find out which is best for your PC. Pete's
plugins are the best recommended.
When setting up Pete's Graphic plugins (press the configure button), you should
see something like this:
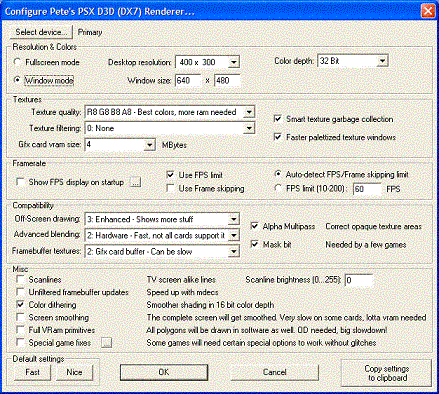
If you have a good PC with alot of RAM (700+ MHZ, 128MB RAM, 64MB video card
memory) then use these settings. Whether you want it fullscreen or window mode
is up to you. If the game runs too slow then just click on the "Fast" button in
the lower left corner of the menu and the emu will run as fast as possible on
your PC. remember to always keep the "Use FPS limit" checked. If it's still not
going good with the graphics thenuse other plugins. I don't have the knowledge
about those since Pete's is the most commonly used plugin. You have to configure
them yourself but they are easier to work with than Pete's.
Sound
plugins: This is the easy part. Just choose between the Eternal, Pete's
or the internal plugin and judge by yourself which makes the game sound better.
The internal plugin is already installed inside the ePSXe.
CD Plugins: Try the ePSXe CD plugins that are already in the emulator first. If those don't work then try Pete's , Mooby or TSG MSCDEX (in that order). The configure screen looks kinda like this (depends on the plugin and its options).
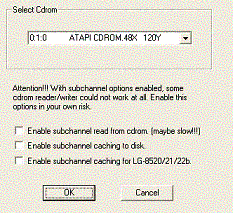
Some games might not work well if played from the CD. In that case try checking
"Enable subchannel read from CDrom". For some games this must be done to
make it work.
For more help or questions about PSX emulation go to http://www.ngemu.com/forums/index.php. There you'll find a message board where people help each other's problems about PSX emulation. You have to register to post though. (It's free). But if your problem might have already been discussed before, all you have to do is click on the search button; it's in the top right corner of the screen. In there type the name of the game you're having problems with and it will show all topics related to that game that have been discussed before.
Sega CD Emulation
The only Sega CD emulator there is is Gens. It can play Sega Genesis/MegaDrive and Sega CD games. Just open File and select the ROM or CD game. All you need to setup are the Sega CD BIOS files to make it work. Same as the ePSXe BIOS files, these are copyright so you have to get them on your own. Use Google or ask somebody online for them. Open Gens and go through these menus -->Option -->Directories/Files...
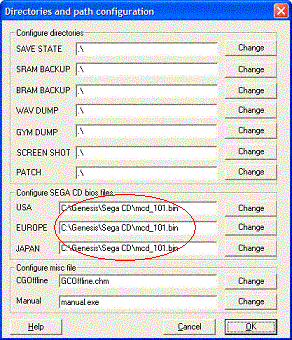
All you need to pay attention to is the circled part. In those 3 fields you must
choose the BIOS files. Just MUST choose the same BIOS file in each one of the 3
text fields. You may have to configure these for each game you have since some
BIOS make one game work and the others won't work. Just keep testing which BIOS
works with what game as long as you select the same BIOS in all 3 regions.
By the way the name of the BIOS are: mcd_101.bin
scd_110.bin mcd2_200.bin
Thanks to me (Last Cetra) who wasted my time on this whole thing
because some newbies can't even turn on their comp without calling a technician
>_< cheers to Myst Man for the emulation section
Long live to the veteran traders Tang and Cide
And up the irons!
Finding and Downloading
Isos:
Brought to you by Frog Man
Finding isos can be tricky when just using conventienal internet surfing devices. The way to go when trying find isos is the IRC. Anything can be found on the IRC, and I mean it. You want games, you can get games with no problem. Reasons why this section wasn't added when the site was first created have finally surfaced. Cetra and Myst_Man(the creators) refrained from giving this info away so that people would be more inclined to trade with them. Pretty clever if you ask me. With special premission I have created this section to satisfy the masses. Now on with the faq.
Note: I use Invision when showing examples cause for me it's easier to read. o_0
Set your IRC client settings as shown here. You may have noticed there is more to the IRC then trading. There are many networks to choose from. I have had the best luck with Newnet, and Efnet. here are some other commands to get onto servers without traversing the file menu
/server <network name> <=This is a simple command used
to join a network. example: /server ir.dalnet.net
/server -m <network name> <=Pops up a new window and connects to a
different network of your choice without disconnecting from the previous one
/list <=This will make a list appear that will show all the channels.
/list <search subject here> <= Refine your searches be using this.
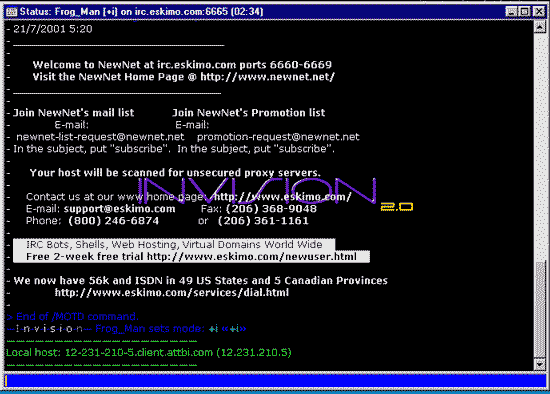
When you finally log onto a network it should look similiar to this. Many times it will say: can't reasign blah blah blah and need to install ident. Just ignore this and if you still can't connect try a different server.
Now that you know how to operate the simple commands its time to move onto the big stuff. Once you pick a network use the /list command. You will notice that the channels with the most people are iso/warez/roms/divx/mp3/anime channels. Since isos are in most cases warez (warez are illegal isos) you can quickly figure out wich channel to join.
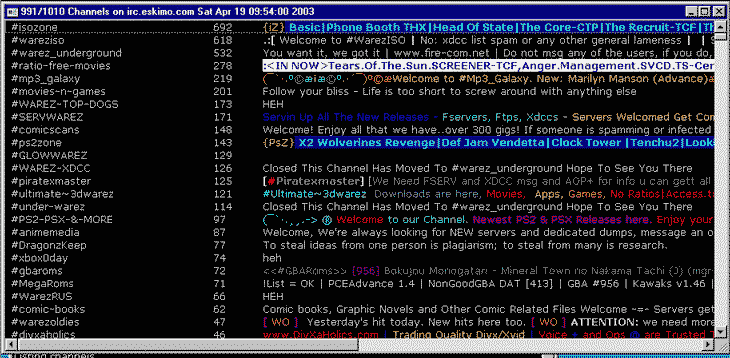
Once you join a channel the next step is to read the rules. Yes there are rules and most the time you get banned for not following them. To get your desired isos you can use two methods besides direct trading.
!list <= Displays a list of all the fservers available.
xdcc list <= Displays a list of the xdcc packets that are avalaible.
@find <what you want to find> <= Helps narrow down your search list
by checking fservers with @find enabled to see if they have the iso.
Special Note: Many places temperarily ban you if you use the !list, @find, xdcc list command so make sure you read the rules.
Ill go over fservers first. People set up fservers to help quench your undeniable lust for isos. What nice people, they let you leech off them so be nice. Once you press !list a list will apear listing peoples fserver statis, trigger, sends, queues, many times an description of what is being offered.
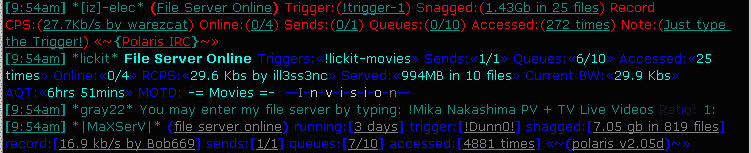
By typeing the trigger you can hop onto an fserver. For example: I want to get onto [iz]-elec's channel (the one at the top) if you look you will see -File Server Online- and after that Trigger. This is where the magic happens. Copy the Trigger. In this case !trigger-1 and watch as you amazingly teleport onto the fserver. As you can see people have variety of different triggers and they must be copyied exactly otherwise it won't work.
Here are some basic commands to travel in a fserver.
help <= Pops up a help section that will tell you what commands do and what
they are.
dir <= Lists all the files/folders in that folder.
cd <folder name> <= This lets you change folders to see what other
treasures the fserver holds.
cd.. <= Goes back a folder.
get <file name> <= Retrieves the file and either sticks you in a queue
line or lets you download it now and there.
queues <= Shows the queue line and how long you'll have to wait for your
turn.
clr_queues <= This usually clears all your queues.
Queue lines are when you have to wait in line. If your impatient try to find fservers with low queue lines so you dont have to wait so long.
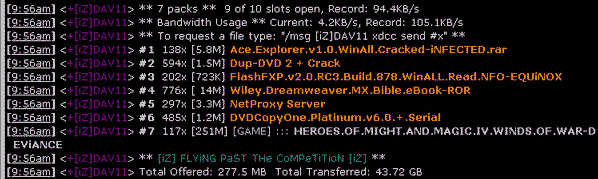
Another way to get isos is by using the xdcc list command while in channel. when you type this and press enter a list of avalaible xdcc packets will show up.
Note: Some channels require that you stay in the channel for about five minutes
before you can access the xdcc or list list.
Here are some commands. XDCC can be a little tricker but I find that people use them less the queue lines are less horrendous.
/ctcp <name> xdcc send #<packet number> <= Sends the packet.
/ctcp <name> xdcc list <= Shows a specific user's xdcc list, if the
have one.
/dccallow <name> <= Always type this if you have to wait in line. The
reason for this is that some people have it setup where they will NOT send you
the file unless YOU dccallow them while in channel. If you start downloading
the file immediately you don't have to do this. But i find it better to be safe
then sorry.
Note: To stay in queue lines you must stay in the channel. Once you leave there is usually a five minute wait then the fserver you are waiting to get your iso from will drop your queue.
Registering a nick is sometimes required to make the !list and other commands work. It is always good to register your nick when you are try to find isos. [from now on im calling isos gamez cause when I say isos over and over it sounds gay. And besides who calls them isos anymore, thats old school. Now, their called gamez, or anything with a z on the end :)] Channels every now and then make you have to have a reg nick to talk in channel. So register your nick now!
/nick <nick> <= change your nick if it is not what you
want. Works in channel or on the network screen.
/nickserv register <password> <email> <= Registers the nick.
An email will be sent to the email address provided by you. Get it, read it
and follow the instructions in that little bugger. Don't worry it's easy.
/nickserv identify <password> <= Make sure your nick is right then
type this to login as your nick. Once you type this and it's accepted you can
finally get them games off even more channels.